If you own a home with a fireplace or wood stove, you’ve probably heard about chimney liners. But do you really need one? And if so, what kind should you get?
A chimney liner is one of the most important components of your chimney system. It keeps your home safe, helps your fireplace or stove run efficiently, and even extends the life of your chimney.
Let’s break down everything you need to know about chimney liner installation—why it matters, what your options are, and whether you should tackle the job yourself or call in a professional.
What Exactly Is a Chimney Liner?
A chimney liner is a protective tube that lines the inside of your chimney flue. Its job? To safely guide smoke, gases, and heat out of your home.
Here’s why that matters:
- Prevents House Fires – A liner stops intense heat from reaching nearby walls or wooden framing.
- Protects Your Chimney – Over time, acidic gases from burning wood, gas, or oil can eat away at bricks and mortar. A liner acts as a barrier.
- Improves Efficiency – A properly sized liner helps your fireplace or stove draft better, meaning less smoke in your home and better heat output.
- Keeps Carbon Monoxide Out – A damaged or missing liner can let deadly gases seep into your home.
If your chimney is old, unlined, or has a damaged liner, replacing it isn’t just a good idea—it’s a must for safety.
Do You Really Need a Chimney Liner?
The short answer? Yes.
In fact, most building codes require a chimney liner. If you’re using a wood stove, gas insert, or oil-burning furnace, a liner is essential for safe operation.
Here are some signs you need a new liner:
- Smoke backing into your home – A damaged or missing liner can mess up airflow.
- Excessive creosote buildup – If you’re cleaning your chimney more than usual, your liner might not be doing its job.
- Cracked or crumbling masonry – This can mean heat and gases are escaping where they shouldn’t.
- Poor draft – If your fire struggles to stay lit or produces a lot of smoke, your liner could be the problem.
- You’re installing a new heating appliance – Some stoves and inserts require a specific liner size.
If any of these sound familiar, it’s time to take a closer look at your chimney liner.
Choosing the Right Chimney Liner
Not all chimney liners are created equal. The best one for your home depends on your heating system, budget, and chimney structure.
1. Clay Tile Liners
- Found in many older homes.
- Inexpensive but can crack over time.
- Best for traditional open fireplaces.
2. Metal Liners (Stainless Steel or Aluminum)
- Stainless steel works with wood, gas, or oil-burning appliances.
- Aluminum is cheaper but only for certain gas appliances.
- Durable, long-lasting, and relatively easy to install.
3. Cast-In-Place Liners
- A special cement-like mixture is poured into your chimney.
- Creates a seamless, insulated barrier.
- Strengthens older chimneys but costs more than other options.
For most homeowners, a stainless steel liner is the best choice. It works with nearly all fuel types, lasts for decades, and is easier to install than clay or cast-in-place liners.
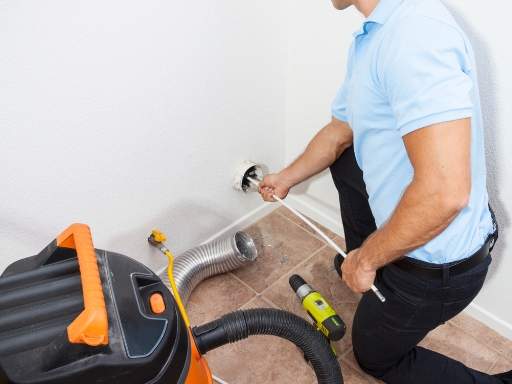
How Chimney Liner Installation Works
Installing a chimney liner is a step-by-step process that ensures your chimney operates safely and efficiently. While the exact method depends on the liner type, here’s what the process typically looks like:
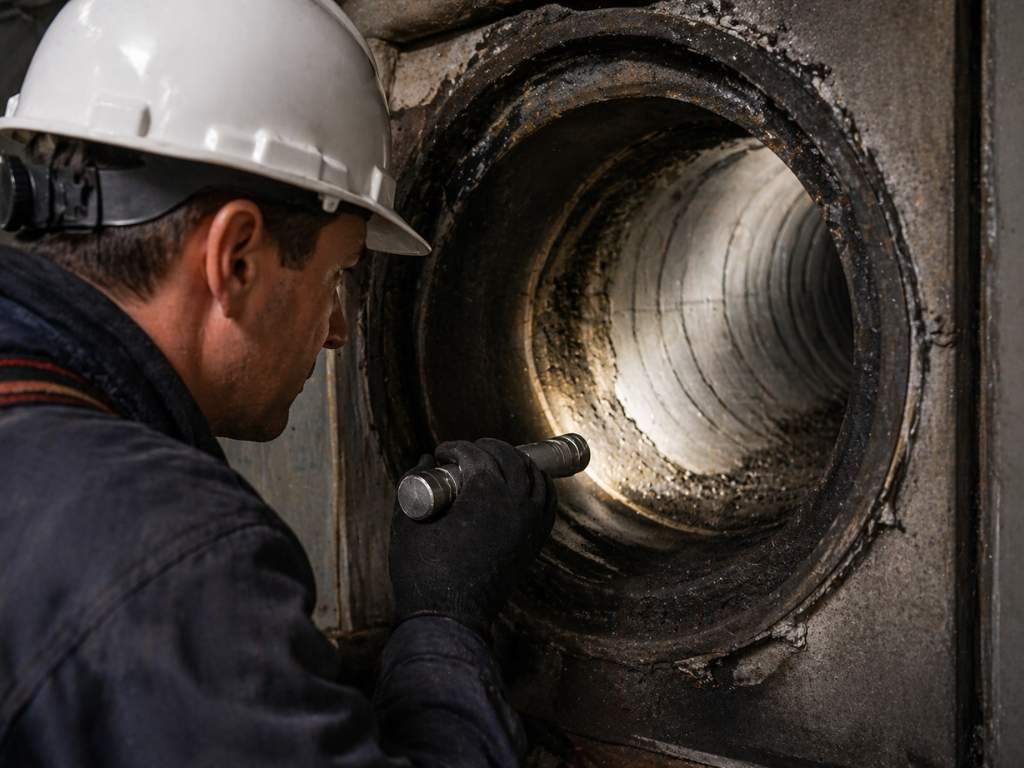
Step 1: Inspection
Before installation, a professional chimney technician will inspect your chimney to assess its condition. They look for:
- Cracks or damage in the existing liner or masonry.
- Blockages such as creosote buildup, debris, or nests.
- Flue size to determine the correct liner diameter.
This step is critical because an improperly sized liner can cause poor airflow, leading to smoke buildup or reduced heating efficiency.
Step 2: Choosing a Liner
After the inspection, the right liner is selected based on:
- Your heating system (wood, gas, or oil-burning appliance).
- Chimney structure (straight or with bends).
- Budget and longevity (stainless steel is durable, while clay is more affordable but prone to cracking).
A stainless steel liner is often the best option due to its durability and compatibility with different fuel types.
Step 3: Cleaning the Chimney
Before installation, the chimney must be cleaned to remove:
- Creosote buildup – This highly flammable substance needs to be eliminated to reduce fire risk.
- Soot and debris – Any blockages can interfere with the liner’s placement.
- Old liner remnants – If replacing an existing liner, damaged sections must be cleared out.
A clean chimney ensures a secure and long-lasting liner installation.
Step 4: Installing the Liner
The installation method depends on the liner type:
- Metal Liners (Stainless Steel or Aluminum) – A flexible or rigid metal tube is lowered down the chimney and attached securely at the top and bottom.
- Clay Tile Liners – Individual tiles are stacked and sealed with mortar. This method is durable but labor-intensive and prone to cracking over time.
- Cast-In-Place Liners – A special cement-like mixture is poured inside the chimney, forming a custom-fit liner that adds structural strength.
Each method has its pros and cons, but stainless steel liners are the most common due to their durability and ease of installation.
Step 5: Sealing and Insulation
After the liner is in place, insulation may be added around it. This helps with:
- Improved efficiency – Reduces heat loss and helps maintain strong airflow.
- Preventing condensation – Moisture buildup can lead to corrosion and liner damage.
For metal liners, insulation is especially important in colder climates where temperature changes can cause condensation inside the flue.
Step 6: Final Inspection
Once the installation is complete, a final inspection ensures:
- The liner is properly secured and vents gases efficiently.
- There are no gaps or leaks where smoke or carbon monoxide could escape.
- The system meets building codes and manufacturer recommendations.
If everything checks out, your chimney is ready for safe use. Regular annual inspections and cleanings will help maintain the liner’s performance for years to come.
DIY vs. Professional Installation: Which Is Right for You?
Thinking about installing a chimney liner yourself? It’s possible—but not always recommended.
DIY Installation
✅Cheaper – A metal liner kit costs between $500 – $1,500.
✅Doable for simple chimneys – If your chimney is straight and accessible, DIY is an option.
❌Tricky to get right – A poorly installed liner can lead to draft problems, leaks, and safety hazards.
❌Not suitable for all chimneys – If your chimney has bends or is deteriorating, professional help is best.
Professional Installation
✅Ensures safety and compliance – Pros know how to size, fit, and seal liners correctly.
✅Handles complex chimneys – If your chimney has bends or damage, a DIY won’t cut it.
✅Long-term peace of mind – A pro installation means fewer problems down the road.
❌Higher cost – Expect to pay $2,000 – $5,000+, depending on the liner type and chimney condition.
For straight chimneys, a DIY metal liner can work. But for anything complex, hiring a pro is the safer choice.
How Much Is Chimney Liner Installation?
The cost of chimney liner installation varies based on liner type, chimney size, and labor. Here’s what you can expect:
- DIY Metal Liner Kit: $500 – $1,500
- Professional Metal Liner Installation: $2,000 – $5,000+
- Clay Tile or Cast-In-Place Liner: $3,000 – $7,000
While DIY saves money, a poorly installed liner can lead to costly repairs later on. If you’re unsure, it’s worth calling in an expert.
Maintaining Your Chimney Liner
A well-maintained liner can last 15 to 50 years, depending on the material and usage. To get the most out of your chimney liner, follow these simple maintenance tips:
- Get Annual Inspections – A certified chimney sweep can check for damage or blockages.
- Clean the Chimney Regularly – Buildup of creosote and soot can reduce liner efficiency.
- Install a Chimney Cap – Keeps out moisture, debris, and animals.
- Monitor Your Heating System – If your stove or fireplace isn’t performing well, your liner could be the issue.
Is It Time for a Chimney Liner?
If your chimney is old, unlined, or showing signs of damage, installing a chimney liner is one of the best things you can do to improve safety and efficiency.
Need help? Neighborhood Chimney Services offers expert chimney liner installation and inspections. Contact us today to schedule an appointment!